Thursday 2 May 2013

Project Evaluation

The work I was doing by the end of this project has changed hugely from the type of work I started out doing and had planned to do throughout this project. 
I started out hoping to make an interactive version of my FMP book, although I wasn't really sure where to start and struggled to find ways of successfully managing this. I felt quite restricted by limiting myself to using the page layouts from my FMP, and from having to think of ideas that I could easily make into a page of a book. 
I changed my idea to not limit myself to a book format, and I do think I have managed to successfully produce interactive items to compliment my book. By changing the format of my experiments I hugely expanded the possibilities of my experiments, and therefore changed the outcome of my project. 

Creating interactive items from paper and card to accompany my book has been a really interesting and useful experience. First of all I think it is a great method of promoting my book, as it helps it to stand out in the huge mass of books that are currently on the market. Secondly, I think it is really important in the modern world full of technology and screens for children to still be encouraged to use their imagination and creativity, and I really like the idea of creating simple games and products to help get children do this. Despite all the technology available to them, if you give a child some pens or some paint and a big piece of paper it will keep them entertained for hours, which I think shows just how much children enjoy being creative, and I would really like to produce work that helps to encourage this.

I think the element of craft and children making things themselves has been an important aspect of my project. I think that even the simplest process of "making" a toy, such as cutting out and putting together a split pin doll, encourages creativity and gives children a sense of accomplishment by letting them feel that they have made that toy themselves. 
The amount of kits you can buy for children with activities such as paint by numbers, or glueing together a hand puppet, reinforces this idea that children enjoy going through the creative process of making a toy before they play with it, even if it is a simple process of cutting around a shape and sticking the pieces together. 

As well as the creative side of my products, there is also a very traditional theme. Toys made from card and paper have been given to children for generations as they are cheap and simple,. Because of this there is a very nostalgic element to them. Parents often like to give their children toys that they themselves played with as children as it brings back all sorts of memories, and this makes it an activity that both parents and children will enjoy. 

I have used some of my more successful experiments as promotional material, for example I took my two split pin dolls to London Book Fair, and I put the designs for my first card game into my portfolio.
I got a lot of positive response for these two pieces, particularly the card game designs, and I have since had two companies that I met in London email me about possible future work, so these are definitely pieces of work that I will use again in the future. 
I think quite a few of the pieces of work I have produced turned out successfully, and with a few adjustments I think I can use a lot of them as pieces of self promotion and to sell in my online shop. 

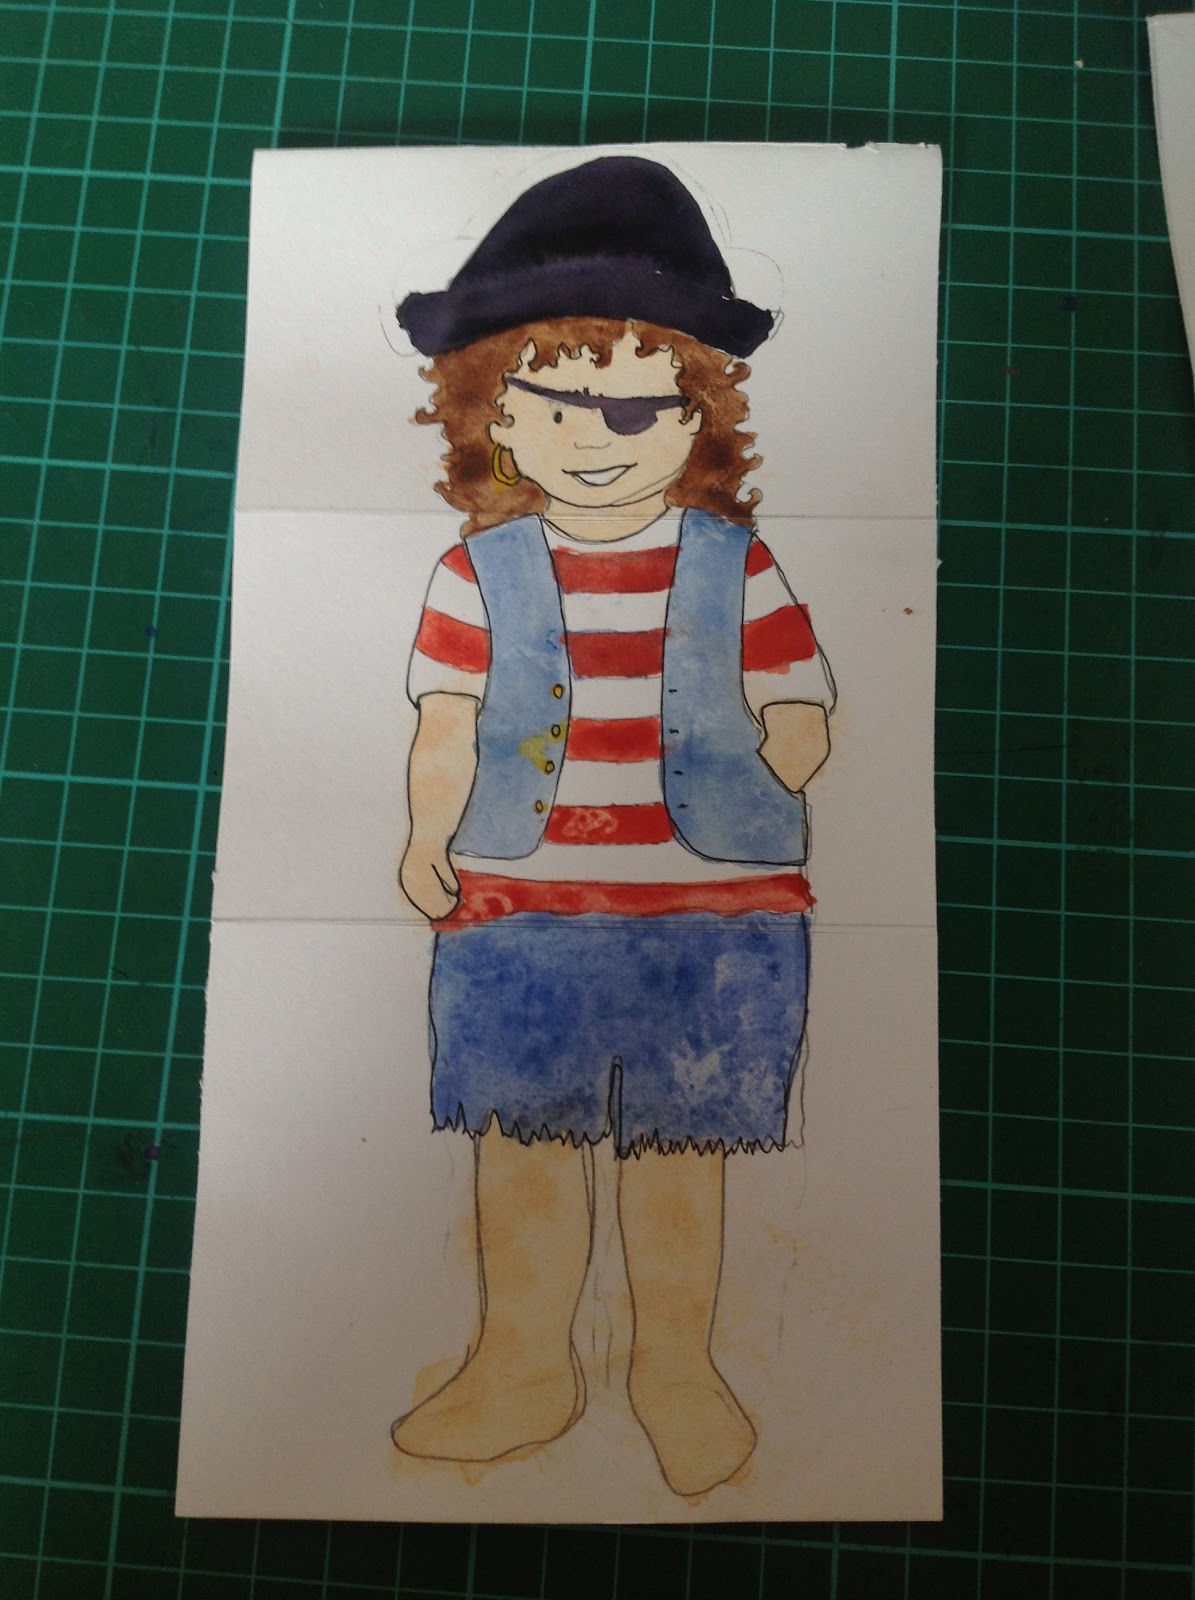
Although my project has been based around the book I have been doing for my FMP, I think that some of the items I have made will be really easy to expand on and adapt to be used for future projects. For example, I have created two designs for split pin dolls using my character and her pet cat, but now that I have experimented with how to design and produce them I can use this information to successfully create other designs that aren't linked with this book, and are perhaps inspired by a book I am working on in the future. 

Overall I think that despite the slow start to the beginning of this project, it has been a success and has provided me not only with promotional material, but also with the beginning designs of many products I can produce for my online shop. From my experiments I have learnt some useful techniques and produced some strong pieces of work that I can definitely use.
I have really enjoyed using these new techniques and seeing my work used in different formats from the usual books or drawings. I think it has given me a fresh outlook on the types of items my work can be used on and with, which will help me to experiment further. A lot of these items, like the dress up doll and the card games, are things I will definitely continue to produce in the future, and I think many of these experiments can be on-going and help inspire me even after this project has finished. 

Dress Up Doll

A similar idea to my mix and match card game, I decided to make a card doll with clothing on tabs to dress up. I drew a girl wearing a basic tshirt and shorts and used tracing paper to design clothes that would fit over the top.

I made small holes to slot the tabs through in her hair, shoulders, and waist, so I had to make sure the tabs on my clothes lined up with these too.

Like my mix and match cards, I wanted a combination of fancy dress outfits and regular clothing to create a bigger variety of games a child could play with it.
Once I had drawn all the clothes I painted them all, and then scanned the sheets of paper. Using photoshop I arranged the girl and all the clothes over two A4 pages, making sure I kept matching items together.


Because I have split the clothes over two pages, it would be interesting to see how themed pages would look. Aside from the basic set you get with the character I could do various pages with different themes, such as "Animals", "Nature", "Weather", "Party Wear" amongst other things. I can fit 3-4 outfits onto a page depending on what kind of items of clothing they are, and that should be enough for each theme, however I could expand this to two pages if I had more ideas for a particular theme.

I could link the style of these with the other experiments I have been doing by adding a dotted line around the edges of each piece, however they are a little fiddly to cut out around the edges so I want to find a way of being able to remove them easily. 
I could make the edges perforated, however this is incredibly time consuming and fiddly unless I had it done professionally, or I could make the clothes into stickers. You can buy sheets of sticker paper that will go through the printer from websites like http://www.craftycomputerpaper.co.uk/, and then cut around the edges of your design. These stickers would be easy to package, as i could put them into cellophane parcels with card stapled to the top to seal it with my contact details on top. This would also give me a chance to mix and match the types of outfits that go together. I could have some parcels that have a theme, and others that are more of a "lucky dip" where you would get a random mix of outfits.
The only big problem I could see with making these dolls as stickers is that it is quite hard to make the stickers reusable. Although stickers will peel off the doll if I have printed it on appropriate paper, stickers tend to curl up and either stick to themselves or lose their stickiness completely. 

I think the best thing to do is try out both and see which works best, although at the moment I think that cutting out the card myself and packaging them in a similar way to how I would package stickers is the best way to produce them.

This is another item that I can continuously expand and add to, as there is no limit on the amount of outfits I can produce for them. 

More Card Games

I really liked the idea of making my work into a game, and I think my mix and match game I had done earlier worked really well as it is completely interactive. I had already also tried making a set of playing cards as a side project, and really liked the effect of these.


I researched children's card games, and found a really interesting website called World of Playing Cards that had information on various card games throughout history. 

I decided to make another card game, but this time make one where the child has to match two cards together, a bit like the traditional "Happy Families" card game.


My idea was that I could have one card with an image of the child dressing up as or trying to become something, and the matching card would be an image of the object. I used some of the images from both my previous experiments and some experiment for my FMP project, and started to put them together in pairs. I also used the same font as my FMP book in order to make them match.


I kept the format of the cards the same throughout, having the text of the first card at the top and using an image of my character. The second card in the pair has the text at the bottom and is a simple image of the object. The colour scheme for the cards each match their pair, making it easier for children to identify which cards match together. 
However, I would need to keep the materials used and style consistent in a set, I used some images from previous experiments so the material switches between paint and collage. If I produced these as a set I would have to choose one style and use this throughout, as the first two pairs go together, and the second two do, but they don't look interchangeable between all four pairs.
I could make two sets, one of which being very simple and painted like the first two, and the other made of collage and slightly more complicated. This would expand the age group I could market my cards to, as the simple painted cards are ideal for younger children who want bright colours and simple images, and the collaged images are more complex which would be more suited to a slightly older child.

I printed the cards on heavyweight paper at A6 size, and rounded the corners. Put together as a set they look really effective, and the size and weight of the paper make it easy for young children to handle. I had tried printing them at half this size, which is standard playing card size, however this would make it difficult for younger children to handle so I decided the larger cards were better suited to my target audience. 


Making these cards also inspired me to make a game of snap. It's a very simple game to make and play, as I needed to make around 6-8 images on cards and repeat them. I decided to make them smaller than my other cards, as it is a game probably better suited to older children. 
I selected 8 images which would be repeated around 4 times to make a pack of cards, and put them into a grid on photoshop to ensure they are all the same size and give me a guideline of where to cut when printed.  


Wednesday 1 May 2013

Split Pin Dolls

Turning my character into a split pin doll is a really effective way of making her interactive.
I wanted to make split pin dolls because once you have the design finished they are incredibly easy and cheap to produce, they are a traditional game that has lasted for generations, and they are something that it is really easy for a young child to make and put together themselves. 
I think the link these dolls have with craft is very important, as a child can put these together with very little help, and then have the satisfaction and pride of feeling like they have created this toy themselves.

The process I use to make my paper cuts for my book means that my character's arms and legs are quite easy to separate from the body using photo shop. 

I designed and cut out a simple posture where all four limbs would move about easily once the split pins are added. Firstly, I scan in my paper cut keeping the limbs separate. 


I had already tried the pieces together before I had scanned them, so I already know they fit together, however I needed to see where they line up so that I can make a mark where the split pin would go. I also had to add the details digitally, such as her facial features. 

Once I had marked on the body and each arm and leg a small circle where the split pins would go I needed to think about how I would present this item. I arranged each piece on a page with simple instructions on how to make the doll. I also added a dotted line all around each piece to show people where they needed to cut, and I think this also added to the aesthetics of the page, making a nice pattern and a feature. The dotted line also matches the lines behind the falling leaves in my book, so it was an effective way to link this to my book. The cut out text also matches the text from my book, so is another strong link between the two and creates consistency. 


I decided to print one off and try it out myself to check it worked and was easy to make. I chose quite thick, matte paper to print on, which gave a lovely effect to the design, however this made it difficult to cut cleanly with a craft knife. It was easier to cut through with scissors though. I will have to try printing them on various types of paper to find a more suitable one.

I found that having 4 split pins on one doll looked a bit too distracting from the design, as they took up alot of the space, and they also seemed to limit how much the other one could move. I tried putting together a second print out of my doll, this time using one pin for the arms and one pin for the legs, which worked much better and looked effective too. I will need to adapt my design to make just two circles for the pins rather than four.
I also struggled a bit in pushing the split pins through the thick paper, however the second time i made one of my dolls I found that cutting a small cross over the hole and slotting the pin in made this much easier, so when I alter how many holes there are on my design i will also change the circles into small crosses.


Once I had created one design I decided to create another using a different character. There is a ginger cat throughout my book that appears on many of the pages, so I decided to make a doll of him too. I also thought this might appeal to young children reading the book, as children always love seeing animals, particularly if they have a pet cat themselves. 

I followed the same process, only this time I used two split pins instead of four. I also used the same format of the design, using the same text and a dotted line to show where to cut. This creates a theme and reinforces the idea that these are part of a set.

The cat was really simple to put together, and even though the size difference is completely out of proportion the two dolls look really good together and I could easily market them as a set. 


This is another method that I could continue to expand on as much as I liked outside of this project, as the character possibilities and combinations are endless.

Tuesday 30 April 2013

Next Steps...

Now I have covered the basics and made some simple cut out items I want to try something more interactive and more complicated.

My bookmarks and cut out dolls are great decorative items and nice objects to accompany my book, but they aren't very interactive for children to play with. I want to create some more items and games like my mix and match card game.

I'm thinking about how I can make my cut out dolls interactive, perhaps by finding a way of making the limbs move. I also want to look at some other card games I can make using my theme of wanting to be something. 

I also want to look at ways of presenting my work in a way that I could sell them or give them out as promotional material. The bookmarks would be fine to give out as they are, but I need to think of ways of packaging and presenting my card game and my cut out dolls.

I think with the cut out dolls I would have to present them printed on the card with a dotted line for where to cut, but I would also need to include instructions with this and I would have to consider whether young children would be able to cut them out themselves. Another option would be to perforate the edges of the doll so you could tear them from the paper. I did some research into how and where I could get my designs perforated, and found that you can buy scissors and tools that you can use to perforate edges yourself. Scissors are too big for what I want to cut, they would be fine for straight lines but for cutting anything small or intricate they would be completely useless, so instead I started looking at the tools.
I found that almost all of the tools were essentially just a sharp point that you press into the paper repeatedly around the edge you want cut, and decided that this was nothing I couldn't do myself with a craft knife and a bit of practice. 
First I tried it with the point of a compass, but I found that this wasnt really sharp enough, and didn't make enough of a hole in the paper to get a clean tear. 
Next I tried it with a scalpel knife, and found that after a bit of practice this worked really well, however this is a time consuming job, and although this is fine for a one off piece it is not something I can realistically do for many pieces of work

Bookmarks

Whilst cutting out some of my dolls it gave me the idea of making bookmarks of my character. What better accompaniment to a book than a bookmark? They are ideal items to make to go with a book as they are small, cheap, make ideal gifts to go with a book, and they don't need to be very hardwearing

Rather than making bookmarks that are the standard rectangle shape I thought it would be much more effective to make some that are cut out all around the edges of my character. 


I printed off a sheet of my character designs on thick paper at half the size of the cut out dolls to make them an ideal size for bookmarks, and cut out around them. I then cut a small hole at the top and threaded a small ribbon through and the bookmark was finished. 


Although only small and simple to make, these make sweet little objects that are ideal to accompany a book. They are also easily customisable, as you can make them using almost any design, change the colour of the ribbon, print it double sided to have a design on both sides, or leave the back blank for people to write a message on


Stand Up Dolls

A really simple way to adapt my work and make it 3D is to make cut outs of my character that can stand up on their own. I have already tried this in an earlier post with my basic character designs, but now I have my character designed for my book I want to try this with her.

I can take this experiment even further by making some of the scenery from the pages using the same technique so children can reinact some scenes using these toys. I can try making cut out dolls of her standing in different positions and in different outfits to follow the story of the book so children can have a card figure for each stage of the story. 


The card I have used to print them on is a bit flimsy and doesn't stand up well or look very good quality, so I think from now on I will print my designs on heavier paper, and experiment with rough paper.

Adapting Fmp into objects

The most obvious part of my book to adapt is my main character. Now I have my character designs finished I can begin to think of ways to adapt the collages I have made of her into interactive objects to promote my book.

I will start simple, by making card dolls that stand up on their own, and then develop these experiments to make games that a child could interact with, and possibly find a way to make dolls with moveable parts. 

I can also use other aspects of my book, such as scenery and objects that appear throughout the book. For example, there is a ginger cat that appears in the background of many of the pages, so I could experiment with that too. 

At this point in the project I can really link my experiments to my FMP as my character designs and ideas have been finished. 


Mix and Match Card Game

I wanted to create a card game to go alongside my book. I was inspired by looking at flip books for children where you can mix and match animal body parts to create new creatures, such as this one by Jen Skelley (http://www.jenskelley.com)


I wanted to link this with my book, and so I see how this idea would translate into a character with different outfits. I drew a basic template of my character so that I could make sure each design matched up at the edges where I wanted to cut - between the neck and shoulders, and just below the arms - so that when put together no matter what combination you used it would still look seamless.

I made eight designs in total, which fit onto two pages that can easily be printed and sold. I tried to vary the designs between fancy dress to match the theme of my book and regular outfits a child would wear, such as a winter coat and scarf, or a pair of pyjamas.


Once I had the designs I printed them off and cut them. I think in the future I need to add a dotted line where they need to be cut to make it easier for people to cut themselves, and perhaps print each design on individual pieces of paper so that they have more space around the edge of each one.


They look really nice together as a set, and in the future I can expand on these and add other outfits to make separate sets that people could purchase. I would need to make sure that any future designs I made were the same size as these and fitted together with them so that people could use them all together, which would make them more collectable and make people more likely to buy multiple sets. 
I could also design a set using a different character. Or perhaps make a character with different facial features and hair, but make sure their body proportions and posture matches this set so that they could be interchangeable if you purchased both sets.


When assembled together the images match up completely lengthways, however because they are on different widths of paper the edges of the paper do not match up which is something I will need to change. 
I can fix this by designing a grid on photoshop and lining them up perfectly before I print them off again, but I would have to make sure I didn't resize them as this could affect how well they match together.


I can also look into other materials to produce these designs onto to make them more sturdy and long lasting. When I was a child I had a game like this but with teddy bears, and the designs were printed onto blocks of wood, meaning that they didn't get damaged and lasted much longer, however this would also add to the production cost of this game, and therefore add to the price I would have to sell them for. 
It would also change the nature of the object entirely, and how I would be able to sell the items. While this is still a card game it still is very simple game that is cheap to produce, and I could sell as a package with my book as a special edition as well as selling on its own. It is easy to make, easy to post to people from my online shop, and has a low production cost so would be more affordable.
If I were to produce this game on wooden blocks I would be unable to package this with the book as they would be bulky and heavy, and would also become more expensive to buy, however it would be much more sturdy and a better quality product.
A way I could solve this is to produce them on card as a standard product, but also produce a "special edition" version printed onto wood. 


I think this is a really effective method that I can greatly expand on and adapt to make lots of different versions. It is definitely something I would continue to use in the future, and although this set was made to match my book I can make various versions of this to go with any books I make in the future.


Change of Idea

I have decided that my original goal for this project of producing an interactive version of my FMP book is unrealistic given the time frame I have. To make a fully finished version of this I would have to wait until I had finished each page of my book before I could adapt it into an interactive version. As my FMP project is running alongside this project I would not have the finished pages until the end of the project, and therefore I would have an incredibly short amount of time in which to adapt and produce my book.

Instead I have decided to focus on experimenting with the games and merchandise that would be produced alongside my book. 
I can use similar ideas and techniques that I had been looking at, but not limit myself to a book format or the same page layouts. I would have more freedom to use techniques that wouldn't work in a book format, giving me chance to do a more varied set of experiments. 

I think it would also be nice to produce a set of merchandise to match my book, as it shows I can work with a diverse range of materials and techniques, and it will give me a good variety of products I can use to promote my book.


Monday 29 April 2013

Textures

I wasn't sure if I wanted my book to have any textures in, as these are generally considered baby books and aimed at a very young market, which doesn't really reflect the age group I am aiming at. My book is a picture book aimed at early readers, around the ages of 3-5 where children would have an adult reading to them but they can follow the story from the pictures and may be beginning to read themselves. 
Generally by this age children are past the stage where they are interested in textures and having sections of the page they can feel, but I thought it would be worthwhile to try and experiment with this anyway and see if I could make this work for my book.

One of my pages in my book is set in the park with autumn leaves falling, so I thought it would be interesting to try using real leaves as texture. Once again I used a photocopy of a layout sketch, cut out leaves to the right shape and tried to glue them on. This didn't really work, even with a stronger glue to stick them after a short amount of time the leaves began to crumble and were constantly coming off the page. 


The leaves were also very difficult to cut to shape, as the edges were very crumbly. Instead I decided to scan in a few leaves and see if they looked good with the collage when added digitally. 


This technique proved to be very effective, as it still provides the texture and interest of the leaves, but with nowhere near as much mess of them falling off, and is also much cheaper to produce than a page with sections you can feel.
I don't think having textured materials on a page works with my book. It isn't suitable to the age group I am trying to market, and isn't easy to produce whilst looking neat and professional.

However, I really like the effect of adding texture to my collages by scanning in real leaves, and this is definitely something I will incorporate into my book

Levers and Tabs in my Book


I decided to use some form or lever of tab on a page from my book to make the character move. A page in my book had a character reaching up to get a scarf from a coat hook, so I decided to make the character move upwards in order to reach it.
I photocopied the page twice, cut out the character on one photocopy and glued a blank piece of paper over where she was standing on the other. Obviously when I make this properly I will use photoshop to take the character out of the scene and print the character on separate paper, but this was a quick experiment using a rough sketch I had made for the page layouts.
I made a cut in the page where she would be standing and I slotted the cut out into place. I then added a tab at the bottom of her legs to make it easier to move her up and down.


This gave the effect of the character reaching upwards, and although it needs adjusting to become neater and have a smoother movement, this technique could be useful. 
I would also need to find a way of attaching her to the page more securely, as with this method the paper figure does slide across a lot which might be difficult for young children to control. The tab to move the character also comes off the bottom of the page, making it look messy and it would stick out of the bottom of the book when closed, so this is another thing I need to think about


Interactive Books

I wanted to look at other interactive children's books on the market and found a huge selection, however one that really stood out was the Maisy Mouse series by Lucy Cousins. To go with her books, she also sells books with pop up and tabs so that children can play with the book and be involved. 
The techniques used are reasonably simple, but have been carefully chosen so they fit perfectly with the story and the page layout. The interactive parts are also easy for a young child to use which is incredibly important, as the novelty of being able to make the characters move would be completely lost on a child if they needed an adult to do it for them. Part of the wonder children have for these types of book is that they are the ones making the character move.


She has also released a massively varied collection of merchandise, but I particularly wanted to focus on the paper craft items.
"Maisy's Farm" is a "carousel" book that opens out to be a 3D paper farm yard, with plenty of paper cut out objects for maisy to play with. 
I had bought this book for my nephew, and he had a great deal of fun playing with it. The only drawback of the book seemed to be that, inevitably, over time the pieces go missing and get ripped and broken. Paper cut out toys like this are simple games that children really love playing with, but they are made in a very delicate material and so they are not made to last, and I when I produce my work I will have to consider ways of making my products sturdy and able to survive this

Photos from Clare Vincent Flickr
http://www.flickr.com/photos/clairevincent/6944294296/

Stand-Up Card Characters

I found that making cut out dolls using some of my character designs was inspiring. I had been thinking of making paper dolls with outfits you could swap to fit with my theme of make believe and imagination, and i found that even just printing the figures onto thick paper and cutting them out was effective. They had a nice effect by standing on their own instead of just being printed on paper, and I think having some kind of paper doll that can stand up is an effective product to accompany my book.


These cut out characters can be used as simply a decoration - table decorations at a children's party perhaps? Or a way of decorating a child's bedroom shelves? - but they also have an interactive element to them. Given to a child they could be used as a doll or a toy, especially if I made them into a set with other characters and objects. 


I could create a set of these dolls using the final character design from my book, perhaps the same character in different positions and postures. I could also use this technique to make the scenery from my book so children could use the dolls to play out scenes from my book. 
This idea is both decorative and interactive, and so I think it would be ideal to make alongside my book.